
Light Microscopy
Everyone remembers from their middle school Biology classes that final magnification of a light microscope is a multiplication of an objective and ocular magnification. Simple, huh? You wish! Let's delve into the amazing microscopy (and not microscopic) world.

Let It Be Light
Wait… did you really think that we will go straight to instrumentation without you knowing the difference between refraction and diffraction? It's going to be somewhat a crash course with basic terms, so good luck.
Focus point - where the light waves converge.
Interference - interaction of two (or more) waves, let it be acoustics, ocean, or light. Can be constructive, when waves meet in phase and increase the amplitude of the final wave, or destructive, when waves meet out of phase and cancel each other out.
Diffraction - when the wave encounters an obstacle and starts behaving weirdly, basically bending or breaking up. This phenomenon is a limiting factor in resolving an image with a light microscope - that's why we cannot see nano-objects.
Refraction - change in direction of light what it is passing through the medium with the different index of refraction (more or less dense). That is why you can take pictures of your cat through the glass of water and get tons of likes on your social media.
Indeed, it was a quite short intro, and now we can start having fun.
Parts of a Microscope
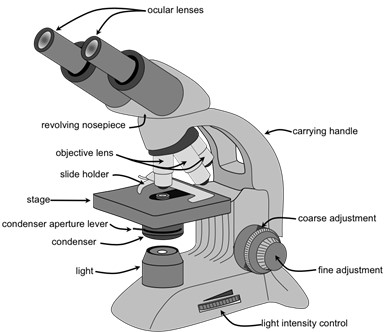
Every microscope is made of many parts, we will discuss only some of them:
- Objective: complex lens system that collects light from the specimen and intended to correct chromatic aberration - inability to focus all colours at one point that results in the blurry image. Normally multiple objectives for one microscope are placed on the revolving nosepiece/turret, so that objectives can be changed fast and easily.
- Ocular lens/eyepiece: collects light from an intermediate image (produced by the objective) and magnifies the real image so it can be projected onto the eye retina.
- Light source: a lamp or light-emitting diode (LED) that illuminates the sample, intensity can be adjusted. For the first microscopes or magnifiers, only daylight or some candles were used.
- Condenser lens: focuses light from the light source on the sample.
- Field Diaphragm: controls how much light reaches the condenser.
- Stage: place for your beloved specimen. Don't forget to fixate it with the holder!
- Focusing knobs: make sure you're looking at what you're supposed to.
- Hecht, E. (2017). Optics. Reading, Mass: Addison-Wesley Pub. Co.
- Murphy, D. B. (2001). Fundamentals of light microscopy and electronic imaging. New York: Wiley-Liss.
Upright vs. Inverted Microscopes
There are two main configurations for the light microscope: upright (which you probably saw at school) and inverted. Both have their own advantages and disadvantages.
Upright microscope is designed in such a way that you can move the stage with the sample, while all the objectives and turret remain still, in such a way transmitted light path starts below the sample - the lamp is below.
Inverted microscope works the opposite (makes sense) way: the stage is fixed, so to focus on your sample you need to move the objective turret.
These days, inverted stage design is more popular, because it allows us to examine living cells or colonies in the medium since it is placed on the stage and the objective is below. In addition, some physiological experiments with cells are more convenient as a stage is handy for manipulations, and some bulky (thus heavy) recording equipment can be placed underneath, as well as the higher quality objectives. Last, but not least - the centre of mass of inverted microscopes is located lower, closer to the table, which makes it more resistant to vibrations.
So, why didn't we all switch to the inverted microscopes? First of all, it is way more expensive, not every lab can afford it. Another reason is that during the work with the inverted stand microscope it is easier to physically damage the objective, for example by smashing it into the stage. Moreover, a hapless sleepy lab technician can accidently spill some immersion oil on it, which is even easier now, because oil can drip due to gravity. It is harder to access and repair the objective, and again it costs money.
Labels on the Objective
There are countless specifications for each microscope objective, but luckily kind manufacturers came up with convenient labelling systems, so that it is easy to see the magnification, numerical aperture, special optical properties and many other parameters. If you are able to remember over a hundred abbreviations, of course. Let's have a closer look:
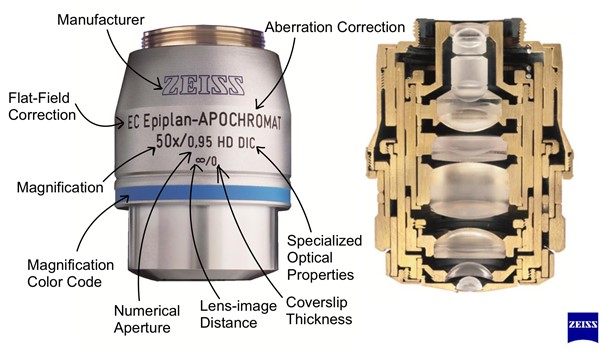
At first sight it's a mess (at second too), but manufacturing companies post many easy-to-use tables, and it is not a problem to find a needed parameter.
Brightfield vs. Darkfield Microscopy
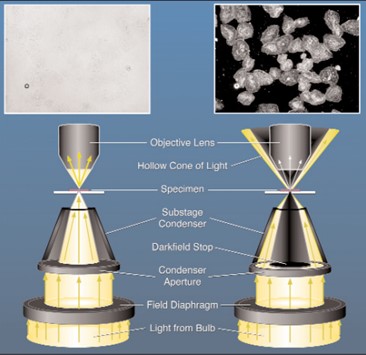
Brightfield microscope is the one we have discussed so far: light from the source passes through the sample on the stage. In this case, both diffracted light (that interacted with the specimen) and non-diffracted light make an image. It works pretty well with different histological specimens, for example, but when the refracting index of a sample is close to the index of medium, it is difficult to see the image, because the part of non-diffracted light is very high. Thus, if it is not possible to stain the transparent object, the darkfield microscopy is used.

When using darkfield microscopy, only diffracted wave components contribute to an image, so it's possible to visualise different bacteria, algae, minerals, crystals and many-many other things on a dark background. But how does it work in terms of equipment?
To switch to the "dark side", you just have to add a darkfield condenser annulus. Wait… what's that? You have to exclude non-diffracted waves so that they don't contribute to the image formation. To do so, you must remove most of the direct light, so it is necessary to add a special element to a condenser. This annulus - disc - is opaque and creates a hollow cone of light, providing indirect specimen illumination.
But during these process some by-products are also produced which can be removed by a gas flow inside the chamber of reaction. For producing high quality thin film, CVD is often used in the industry of semi conductors. The carrier gas in CVD is mostly the mixtures of hydrogen, argon, nitrogen and also their compositions. There are several types of CVD, Let's try to introduce them!
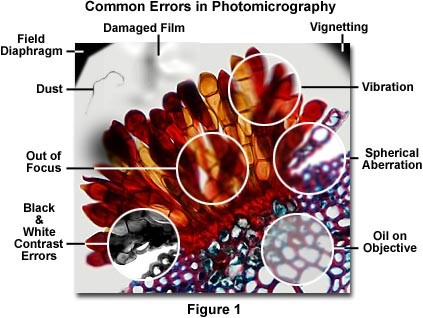
Common Errors in Microscope Alignment
This picture brings pain to every biology college student. At least now you know how to distinguish screw-ups.
Acknowledgement

Content of the web page has been developed by Polina Kostina, student of Delft University of Technology (TU Delft).